Step-by-Step Guide to Stunning DIY Gel Nails
This guide provides a detailed, easy-to-follow process for creating gorgeous DIY gel nails. From prepping your nails with cuticle care and base gel, to applying full-cover tips and intricate nail art designs like French tips and 3D flowers, this tutorial ensures long-lasting, professional-looking nails at home. Finish with embellishments and cuticle oil for a polished, salon-worthy result.
1. Nail Prep:
Cuticle Care:
Apply a cuticle remover (e.g., Sally Hansen) to soften the cuticles.
Wait about 15 seconds, then use a cuticle pusher to gently push back the cuticles.
Wash your hands with warm, soapy water to remove all the product.
Buff & Clean:
Use a fine-grit buffer to etch the surface of your nails. This removes oils and shine, creating a better surface for nail products.
Clean off any dust and oils using acetone on a lint-free wipe.
2. Nail Tip Application:
Full-Cover Tips:
Choose full-cover stiletto tips (or any other desired shape) that fit perfectly from sidewall to sidewall.
Apply nail glue to both the tip and natural nail. For better adhesion, you can slightly etch the inside of the tips (where it meets your nail) using a nail drill at around 5,000 RPM, but this is optional as many tips come pre-etched.
Press the tip at a 45° angle to the natural nail and apply gentle pressure forward until the gel or glue fully covers the nail. Flash cure for about 15 seconds to hold it in place.
After all the tips are applied, cure them fully in your lamp for 60-90 seconds to ensure the glue is properly set.
Shaping:
Clip the tips to your desired length.
Use a 180-grit file to shape the nails into an almond shape (or another shape if you prefer).
Blend the seam between the natural nail and the tip with a 180-grit sanding band to ensure a seamless look.
3. Base and Builder Gel:
Builder Gel Application:
Apply a thin slip layer of builder gel all over your nails, which will act as a base to help the product flow smoothly. Don’t cure it.
Add a bead of builder gel to the center of the nail and use a brush to spread it evenly from the cuticle to the tip. Flip your nail over to help the gel self-level.
You can gently manipulate the gel with a liner brush to perfect the shape.
Cure each nail for 60-90 seconds under the lamp to fully set the gel.
4. Nail Art:
French Tips:
For the French tips, apply a sheer gel for the base color, and use a white gel for the tip. Blend the colors together for a smooth ombre effect.
Use an ombre brush to help with the blending. Cure each layer as you go.
For the ring finger, you can create a more defined white French tip or add another layer of sheer gel to get the desired look.
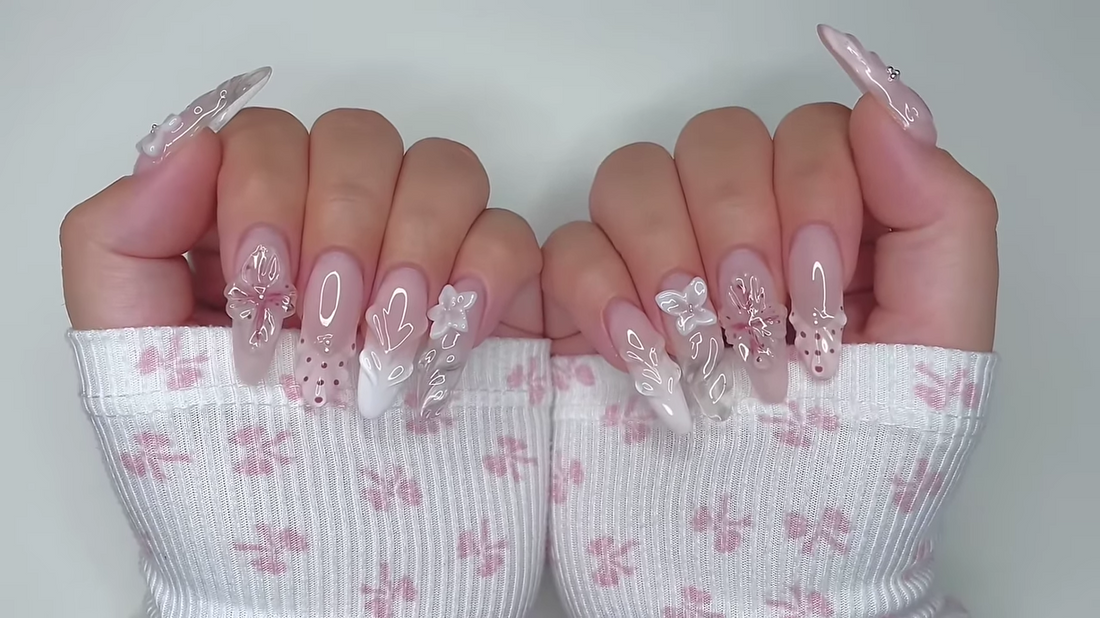
3D Nail Art (Flowers, Butterflies, etc.):
For 3D designs, take non-stick gel (clear or white), and use a cuticle pusher to scoop a small amount. Roll it into a ball with your fingers and flatten it out into a petal shape.
Place the gel petals one by one to create a flower or butterfly design. Use your fingers to shape and press down on the gel, curing each bead before adding more.
Repeat this process on each nail as desired, making sure to flash cure the gel after each application to prevent it from running.
5. Details and Topcoat:
Adding Details:
Use a liner brush and a dark gel polish (like vintage pink) to create fine lines or strokes within the design. These can add texture or a more organic feel to your artwork.
If you make any mistakes or get gel outside your design, clean it up with a brush dipped in acetone.
After the detailing is complete, apply a top coat over the entire nail to seal everything in place. Make sure to cure it for the full recommended time.
Embellishments:
For extra flair, use pearls or caviar beads. Apply rhinestone glue to areas like the smile line of the French tip or the center of a flower.
Use a small brush to place the beads or pearls, then flash cure them until they are secure.
6. Final Touches:
Cuticle Oil:
Finish off the look by applying your favorite cuticle oil to hydrate your nails and surrounding skin. I recommend using a rose-scented oil to keep things feeling luxurious and fresh.