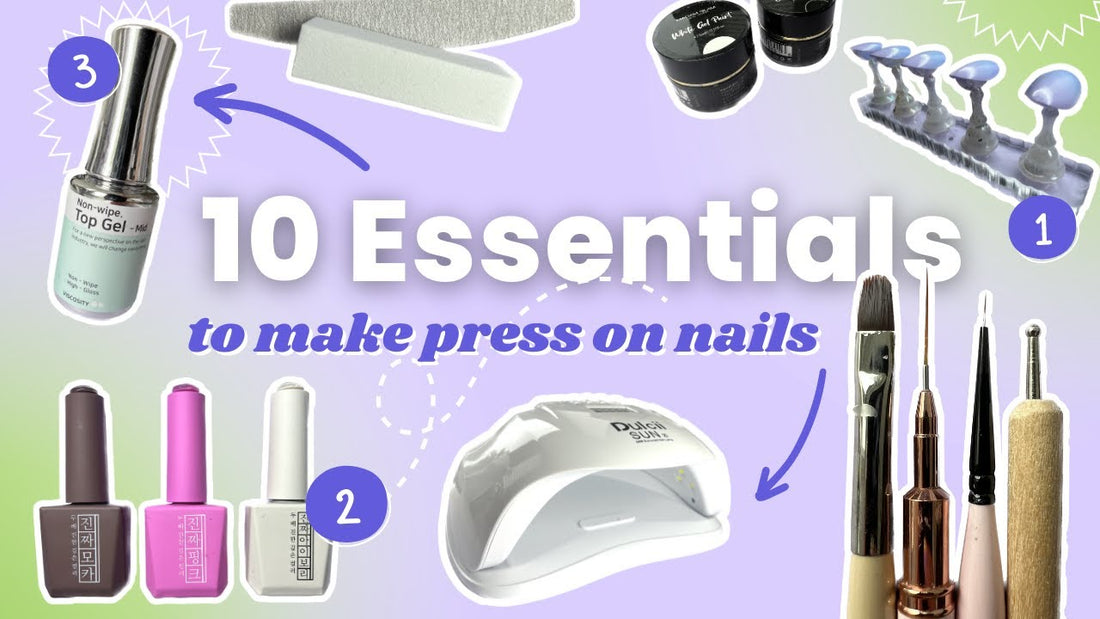
Essential Products for Making and Selling Press-On Nails
Creating and selling your own press-on nails can open up a world of creativity and potential income. While the costs of nail products can quickly add up, knowing what essentials to invest in can set you up for success. In this tutorial, we’ll cover the top 10 products you need to get started, along with a bonus item for those looking to sell or gift their creations. Whether you're a beginner or seasoned pro, these tools will help you craft stunning press-on nails safely and efficiently.
-
Safety Gear
Always wear nitrile gloves and a mask when handling uncured gels. This prevents harmful monomers from absorbing into your skin and protects your lungs from dust and plastic particles. -
Select Nail Tips
Choose full cover nail tips, which serve as the base for any press-on set. Opt for shapes and lengths that suit your style or target market, such as short almond for a natural look. AA brand tips are highly recommended for their thin cuticle area and strong tips. -
Invest in Nail Stands
Acrylic nail stands offer better stability and allow for easier painting than their metal counterparts. They come with solid bases, preventing tipping and making nail painting more convenient. -
Filing and Buffing
Use a file to remove any plastic tips left on the ends of nail tips. Buff the nails to smooth imperfections and create a clean surface for gel application. A buffing block is great for prepping nails for chrome or nail art. -
Use Alcohol and Acetone
Clean your nails with 80% or higher alcohol and acetone. Alcohol removes the inhibition layer from cured gel, and acetone can help thin out gel or remove it entirely. These are essential for creating clean nails. -
Lint-Free Wipes
Dust and lint can damage the smooth finish of your nails. Use lint-free wipes soaked in alcohol or acetone to keep surfaces clean and dust-free before applying gel. -
Choose Quality Gel
Invest in a variety of gel products, such as nude gels (in translucent or opaque finishes), white and black gels for design work, and a primary set of red, blue, and yellow gels for mixing other colors. -
Top Coat Application
Finish with a high-quality non-wipe top coat to seal in your design. Top coats come in different finishes (matte, glossy) and viscosities, so experiment to find your preferred one. -
Essential Brushes
Get a few brushes to create beautiful designs. An oval gel brush, long liner brush, thin liner brush for detail work, and a dotting tool will give you the versatility to create any nail art. -
Nail Lamp
A nail lamp is crucial for curing gel. Choose a lamp with sufficient wattage to ensure your gel cures properly. Research before purchasing for optimal results.
Bonus Item: Packaging Supplies
If you're selling or gifting press-on nails, packaging is key. Use double-sided tape to mount nails neatly, and pre-cut tape makes it easier to secure each piece. While you don’t need a fancy backing card right away, focus on delivering high-quality nails first.