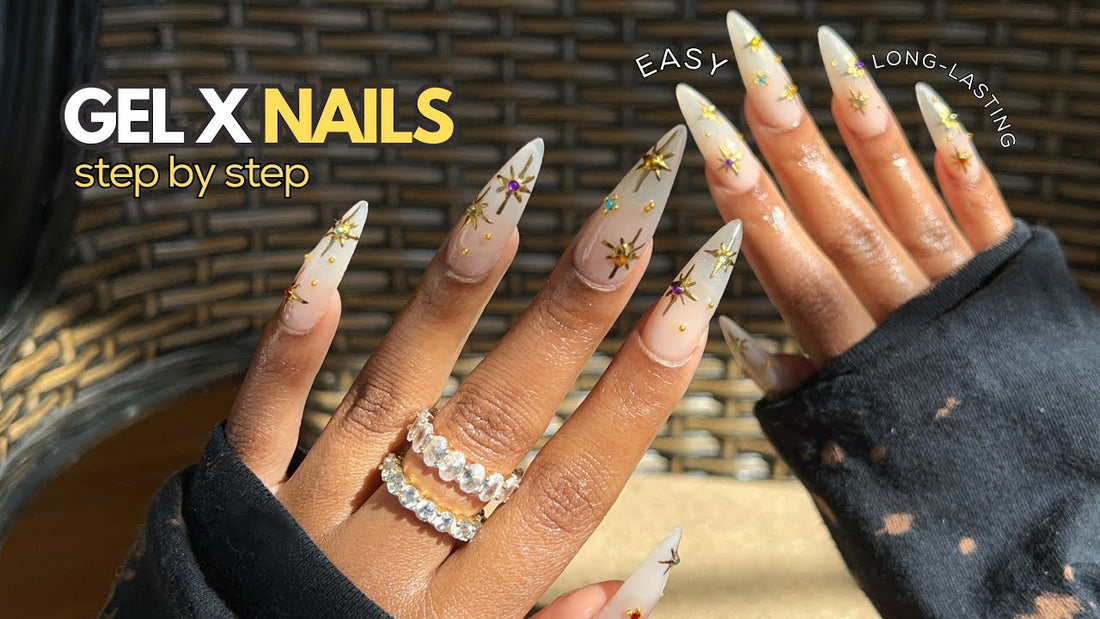
Celestial-Inspired Stiletto Nail Art Tutorial
In this video tutorial, you'll learn how to create stunning stiletto nails with a celestial twist, featuring rhinestones, painting gel, and gold chrome accents. The process includes proper sizing of nail extensions, etching, applying gel, and decorating with star-inspired designs. Follow along for a step-by-step guide to achieving an eye-catching nail look with a unique, space-themed aesthetic.
-
Size the Extensions
Start by selecting the right size of stiletto extensions. Begin with size zero or one, and check the fit by turning your hand to the side to ensure there’s no gap. Opt for the size that feels most comfortable. -
Etch the Extensions
Using an e-file with a sanding band set to 3,000 RPM, gently etch the inside of each extension to improve adhesion. Focus on covering the full surface of the extension, avoiding excessive pressure to prevent over-filing. -
Prep the Natural Nails
Apply a dehydrator and primer to your natural nails, allowing the primer to sit for about 15-20 seconds to get tacky. -
Apply Extend Gel
Apply extend gel on both the natural nails and the inside of the extension, following the product instructions for optimal adhesion. -
Cure the Extensions
Cure your nails in a lamp for 30 seconds to set the extend gel before applying the extensions. -
Apply the Extensions
Carefully place each extension on your natural nail, ensuring it is firmly attached. Press down gently to ensure a secure fit. -
File and Shape
Use a fine file to crisp up the edges of your extensions and smooth out any points at the tip. Take care not to over-file around the cuticle area, as these extensions are thinner. -
Create the Star Design
Using a dotting tool and black painting gel, place four dots in a star pattern around the rhinestones. Draw the lines connecting the dots with a fine liner brush to form star rays. -
Apply Chrome and Rhinestones
Apply gold chrome to the star design, then use rhinestone glue to secure rhinestones and caviar beads around the design. Finish with a final layer of chrome polish to enhance the reflective effect. -
Final Touches
Buff the chrome for a smooth, mirrored finish and clean off any excess with alcohol. Apply a tempered top coat and cure for 60 seconds to seal the design.