Heatless Curling Headband Tutorial: Get Beautiful, Long-Lasting Curls Without Heat
This tutorial shows you how to create stunning, long-lasting curls using a heatless curling headband. With a few simple steps, you can achieve soft, voluminous curls that last longer than those made with a curling iron, all without causing any heat damage. Perfect for busy mornings or sleeping in overnight, this method is customizable based on how tight or loose you wrap your hair for different curl styles. Get ready to enjoy effortless curls with minimal time and effort!
1. Prep Your Hair:
Hair Dryness: Your hair should be around 95% dry. It should feel dry, but still slightly cool to the touch. If your hair is completely dry, lightly mist it with water using a spray bottle. Focus on the lower sections (from the temples down) where you'll be wrapping.
Optional Products: While it’s not necessary, you can apply a lightweight texture spray or mousse for added volume. These products can help enhance the curl and hold, but they're not required for a successful result.
Brush and Parting: Brush through your hair to remove any tangles. Part your hair wherever you prefer (middle or side part) as this will affect how the curls fall. Once parted, separate your hair into two sections down the back, bringing both forward in front of your shoulders.
2. Place the Headband:
Headband Positioning: Place the curling headband over your head like a normal headband, at the crown of your head. It should rest comfortably on your head without feeling too tight. The headband should be centered and balanced on both sides of your head.
Holding the Headband: Hold the headband in place with one hand, ensuring both sides are even. This step is important because it ensures the curls will be symmetrical once you're done wrapping.
3. Wrap the Hair:
First Section of Hair: Take a small section of hair (about 1-2 inches) near your part and place it flat against the headband. Starting at the roots, pull the section of hair over the headband and wrap it tightly under it, bringing it toward the front of your face.
Securing the First Wrap: Once the hair is pulled underneath, make sure it wraps snugly around the headband. This first wrap is crucial for holding your curls in place.
Continue Wrapping: Move to the next section of hair, joining it with the previous one. Pull this section over and under the headband, ensuring that each new section touches the previous one for a seamless curl formation. Continue wrapping until you reach the nape of your neck.
Even Wrapping: Try to keep the sections even in size as you go along. This helps with consistency and even curls throughout your hair.
4. Secure the Hair:
Using the Scrunchie: After you’ve wrapped all the hair around the headband, use the provided scrunchie to secure the ends. Pull the scrunchie over the ends of your hair to hold everything in place.
Smooth the Ends: As you wrap the scrunchie around the ends, ensure that the hair remains smooth to avoid kinks or creases. The goal is to keep the curls looking soft and natural, so avoiding sharp bends is key.
5. Repeat on the Other Side:
Second Section: Now, repeat the exact same process on the other side of your head. You can adjust the tightness of the wraps depending on the curl style you want:
Tighter wraps will give you more defined, spiral curls.
Looser wraps will give you softer, voluminous curls.
Small Sections for Classic Curls: For more classic, tighter spiral curls, take smaller sections of hair as you wrap. The smaller the section, the more defined the curl.
6. Finish and Sleep:
Tucking in the Ends: Once both sides are wrapped and secure, cross the ends of the headband at the nape of your neck. Tuck the ends under to make sure everything stays in place. You can choose to leave the ends hanging or tuck them in for a neater finish.
Comfort for Sleep: This headband is designed to be comfortable, like a pillow, so you can sleep in it overnight. It should stay in place and won’t cause discomfort while you sleep. Alternatively, if you need curls fast, you can wear it while getting ready in the morning or after a workout for a shorter curl time.
7. Wait for Hair to Dry:
Hair Drying Tip: It’s important to let your hair dry fully before removing the headband. This ensures the curls hold their shape. If you’re sleeping with it, the headband will keep your hair in place while it dries overnight. If you’re doing this in the morning, you can leave it in for about 1-2 hours or until your hair is fully dry to the touch.
8. Reveal Your Curls:
Remove the Scrunchies: Carefully take out the scrunchies and start unwrapping the headband. Do it gently to avoid disrupting the curl shape.
Loosening the Curls: Once you’ve removed the headband, use your fingers or a wide-tooth comb to gently separate and loosen the curls. This will add volume and create a soft, bouncy look.
Finishing Touches: If you want more volume, you can lightly fluff the curls with your fingers or add a bit of hairspray for extra hold.
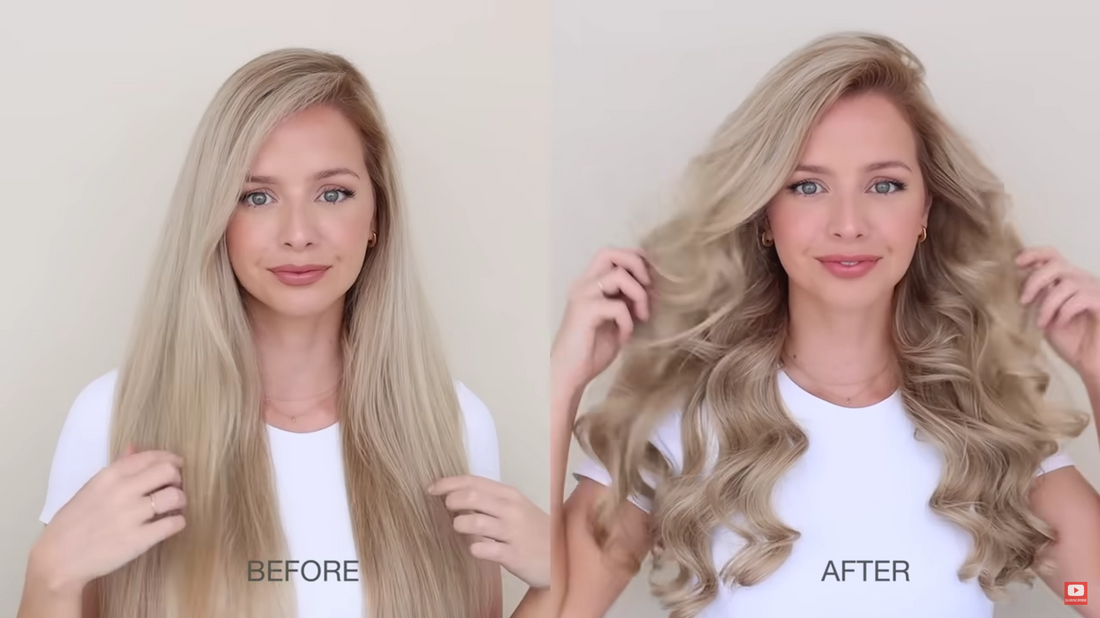
Final Results:
You’ll be left with heatless, soft, and voluminous curls that last longer than traditional curling iron curls. It’s a no-damage, customizable method to achieve the perfect curls with minimal effort.